
android_learning:headfirst_android_development_notes:chapter_3
Table of Contents
Chapter 3 notes
Keyboard shortcuts for emulators
There's no obvious way to do things like push power and volume buttons on an AVD. You can use keyboard shortcuts to do these kinds of things. The official Android documentation misses some of the available shortcuts; the list at shortcutworld.com is more complete.
Genymotion shortcuts are listed in the user guide under “Keyboard Shortcuts”. I wasn't able to find documentation for Visual Studio Emulator for Android's keyboard shortcuts.
p. 75: Project properties
- App Name:
Messenger1) - Company Domain:
hfad.com - Activity Name:
CreateMessageActivity - Layout Name:
activity_create_message
p. 76: Code block
<RelativeLayout xmlns:android="http://schemas.android.com/apk/res/android"
xmlns:tools="http://schemas.android.com/tools"
android:layout_width="match_parent"
android:layout_height="match_parent"
android:paddingBottom="16dp"
android:paddingLeft="16dp"
android:paddingRight="16dp"
android:paddingTop="16dp"
tools:context=".CreateMessageActivity" >
<Button
    android:id="@+id/send"
    android:layout_width="wrap_content"
    android:layout_height="wrap_content"
    android:layout_alignParentLeft="true"
    android:layout_alignParentTop="true"
    android:layout_marginLeft="36dp"
    android:layout_marginTop="21dp"
    android:onClick="onSendMessage"
    android:text="@string/send" />
<EditText
    android:id="@+id/message"
    android:layout_width="wrap_content"
    android:layout_height="wrap_content"
    android:layout_alignLeft="@+id/send"
    android:layout_below="@+id/send"
    android:layout_marginTop="18dp"
    android:ems="10" />
</RelativeLayout>
p. 77: Code block
package com.hfad.messenger;

import android.app.Activity;
import android.os.Bundle;
import android.view.View;

public class CreateMessageActivity extends Activity {
    @Override
    protected void onCreate(Bundle savedInstanceState) {
        super.onCreate(savedInstanceState);
        setContentView(R.layout.activity_create_message);
    }

    //Call onSendMessage() when the button is clicked
    public void onSendMessage(View view) {
    }
}
A note about these code blocks!!
Heads up!!!
You may have noticed that our apps up to now don't show an app name at the top of the screen. This is due to (once again) the way newer Android Studio generates files compared to the version used in HFAD.
If we stick to the files generated by Android Studio and modify them rather than replacing them outright, we'll have better results. Here's the default contact_create_message.xml file as generated by Android Studio 1.5.1 and after I removed the TextView and added the Button and TextEdit from the code in HFAD:
- contact_create_message.xml
<?xml version="1.0" encoding="utf-8"?>
<RelativeLayout
    xmlns:android="http://schemas.android.com/apk/res/android"
    xmlns:tools="http://schemas.android.com/tools"
    xmlns:app="http://schemas.android.com/apk/res-auto"
    android:layout_width="match_parent"
    android:layout_height="match_parent"
    android:paddingLeft="@dimen/activity_horizontal_margin"
    android:paddingRight="@dimen/activity_horizontal_margin"
    android:paddingTop="@dimen/activity_vertical_margin"
    android:paddingBottom="@dimen/activity_vertical_margin"
    app:layout_behavior="@string/appbar_scrolling_view_behavior"
    tools:showIn="@layout/activity_create_message"
    tools:context="com.hfad.messenger2.CreateMessageActivity">

    <Button
        android:id="@+id/send"
        android:layout_width="wrap_content"
        android:layout_height="wrap_content"
        android:layout_alignParentLeft="true"
        android:layout_alignParentTop="true"
        android:layout_marginLeft="36dp"
        android:layout_marginTop="21dp"
        android:onClick="onSendMessage"
        android:text="@string/send" />
    <EditText
        android:id="@+id/message"
        android:layout_width="wrap_content"
        android:layout_height="wrap_content"
        android:layout_alignLeft="@+id/send"
        android:layout_below="@+id/send"
        android:layout_marginTop="18dp"
        android:ems="10" />
</RelativeLayout>
It's almost identical to the version in HFAD, but the small differences in the first 14 or so lines the top are important.
Differences with CreateMessageActivity.java are more substantial. Here is the CreateMessageActivity.java file as created by Android Studio 1.5.1 but with the addition of a stub for the onSendMessage handler.
- CreateMessageActivity.java
package com.hfad.messenger;

import android.os.Bundle;
import android.support.design.widget.FloatingActionButton;
import android.support.design.widget.Snackbar;
import android.support.v7.app.AppCompatActivity;
import android.support.v7.widget.Toolbar;
import android.view.View;
import android.view.Menu;
import android.view.MenuItem;

public class CreateMessageActivity extends AppCompatActivity {

    @Override
    protected void onCreate(Bundle savedInstanceState) {
        super.onCreate(savedInstanceState);
        setContentView(R.layout.activity_create_message);
        Toolbar toolbar = (Toolbar) findViewById(R.id.toolbar);
        setSupportActionBar(toolbar);

       FloatingActionButton fab = (FloatingActionButton) findViewById(R.id.fab);
        fab.setOnClickListener(new View.OnClickListener() {
            @Override
            public void onClick(View view) {
                Snackbar.make(view, "Replace with your own action", Snackbar.LENGTH_LONG)
                        .setAction("Action", null).show();
            }
        });
    }

    @Override
    public boolean onCreateOptionsMenu(Menu menu) {
        // Inflate the menu; this adds items to the action bar if it is present.
        getMenuInflater().inflate(R.menu.menu_create_message, menu);
        return true;
    }

    @Override
    public boolean onOptionsItemSelected(MenuItem item) {
        // Handle action bar item clicks here. The action bar will
        // automatically handle clicks on the Home/Up button, so long
        // as you specify a parent activity in AndroidManifest.xml.
        int id = item.getItemId();

        //noinspection SimplifiableIfStatement
        if (id == R.id.action_settings) {
            return true;
        }

        return super.onOptionsItemSelected(item);
    }

    // Call onSendMessage when the button is clicked.
    public void onSendMessage(View view) {
    }
}
If you look over this version of CreateMessageActivity.java, you can probably figure out which lines of code are introducing the interface features. I will continue to use this version of the file throughout this chapter and approach future projects in a similar way.
p. 78: Create a second activity
The create activity screen should look like this:

When you click “Finish” Android Studio will create two new layout files:
activity_receive_message.xmlcontent_receive_message.xml
As we have seen before, activity_receive_message.xml is the wrapper and content_receive_message.xml has the content that we're actually interested in.
Remember: edit content_{whatever}.xml files. Leave activity_{whatever}.xml files alone.
pp. 85-87 Codecheck 1
The app through p. 87.
p. 89
The Pool Puzzle is challenging, but try to do it without looking at the solution on p. 90. Start by thinking about the logic that needs to happen, then write the code.
p. 91
The code on p. 91 refers to a constant ReceiveMessageActivity.EXTRA_MESSAGE. When you add this to the editor, Android Studio will get angry and tell you it doesn't exist. You will create the constant later when you edit ReceiveMessageActivity.java.
p. 92
Do not replace the contents of ReceiveMessageActivity.java with the code from the book. Instead, figure out where in the code generated by Android Studio to place the following code snippets:
public static final String EXTRA_MESSAGE = "message";
Intent intent = getIntent();
String messageText = intent.getStringExtra(EXTRA_MESSAGE);
TextView messageView = (TextView)findViewById(R.id.message);
messageView.setText(messageText);
Make sure to add the needed import statements as well.
p. 94: Codecheck 2
The app through p. 94.
p. 97
You can find a list of common intents (what the book calls standard actions) in the official Developer documentumentation. The documentation also shows you what Intent.EXTRA_{whatever}s you can set for each common intent using the putExtra method.
p. 98: Codecheck 3
The app through p. 98.
p. 105
Windows users, before you try to run your app on a real device, make sure you have the necessary driver installed. If you are using a Nexus device, you should be able to use the Google USB Driver available in Tools > Android > SDK Manager on the SDK Tools tab.
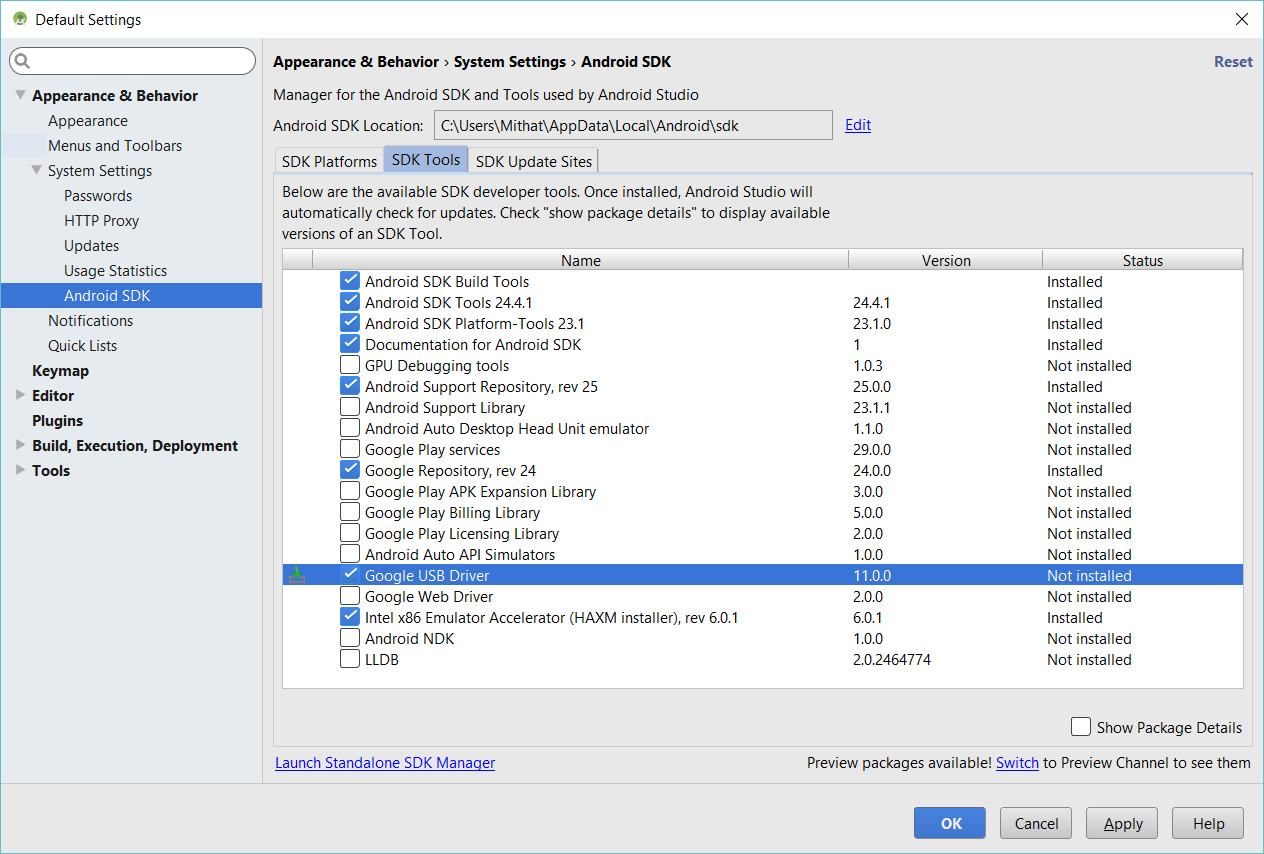
Mac and Linux users won't need additional drivers.
p. 111: Finished
p. 114
Add this to the bullet points:
- An Android app is a collection of Activities.
- You move from Activity to Activity, whether within your app or in another app, via Intents.
- Intents can be explicit or implicit.
- Actions are used to specify standard operations with implicit Intents.
1)
As though there weren't enough apps named “Messenger” already.
android_learning/headfirst_android_development_notes/chapter_3.txt · Last modified: 2016/01/09 01:09 by mithat